
Last updated on August 7th, 2024
I am always on the lookout for ways to enjoy my favorite treats without compromising on taste or throwing my diet off track. That’s why sugar-free cookie dough has become a staple in my kitchen – allowing me to indulge my sweet tooth while still maintaining a healthy lifestyle. However, the key to making this delightful dough last is proper storage, so I’d like to share some tips on how to store sugar-free cookie dough effectively.
Over the years, I’ve found that keeping sugar-free cookie dough fresh and ready for baking relies on three main factors: temperature, moisture control, and avoiding cross-contamination. By following the tips I’m about to share with you, not only will your sugar-free cookie dough taste delicious, but you’ll also prevent any waste due to spoilage. So let’s dive into the world of sugar-free cookie dough storage!

Sugar Free Cookie Dough vs Traditional Cookie Dough
First, it’s important to understand the components of sugar-free cookie dough and their role in preserving the dough.
Traditional cookie dough relies on added sugars to maintain moisture and freshness, but since our sugar-free version obviously omits those sugars, we need to consider alternative methods for storing and preserving the dough.
Thankfully, I have experimented and discovered some effective ways to ensure your sugar-free dough stays fresh and ready-to-bake.
Essentials of Sugar-Free Cookie Dough Storage
Storing sugar-free cookie dough can be a little tricky, but I’m here to help you do it the right way! With these simple tips, you can keep your cookie dough fresh and ready to bake.
First, let me tell you about temperature.
It’s essential to store the dough at the right temperature, ideally in the refrigerator or freezer.
Here’s a little table to help you with the recommended storage times:
| Storage Location | Ideal Temperature | Storage Time |
|---|---|---|
| Refrigerator | 35-40°F (2-4°C) | 3-5 days |
| Freezer | 0°F (-18°C) | 2-3 months |
Pro tip: If you plan on keeping the dough in the freezer, divide it into smaller portions and label the bags with the date you made the dough. That way, you can keep track of its freshness!
Next, let’s talk about containers. It’s best to use an airtight container to store your sugar-free dough. You could use:
- Plastic food storage containers
- Glass containers with tight-fitting lids
- Sealable plastic bags
Remember to press out any excess air before sealing the container, as this helps keep the dough from drying out and developing ice crystals.
Finally, let’s discuss protection.
To ensure your dough maintains its quality, take care to protect it from moisture and odors. If you’re using a sealable plastic bag, you may want to double-bag it and place it in a separate compartment in your refrigerator or freezer. That way, you’ll minimize the chance of strong-smelling foods affecting your dough.

- ♻【FOOD GRADE MATERIAL & REUSABLE】Made of food-grade PEVA material, reusable storage bags are PVC-free, lead-free, chloride-free and BPA FREE, an eco-friendly and recyclable material. You don’t need worry about your heath with these food bags and they are not harmful to the environment. One reusable ziplock bags silicone can save up to 350+ disposable plastic bags, save our planet and save your money.
- ♻【NEW HOME ESSENTIALS MUST HAVES】 10 pack reusable ziplock bags various sizes set, contains 3 extra large reusable gallon freezer bags (11 x 11 inches) are great for marinating meats, frozen foods, cereal, cookies, office supplies; 4 food storage bags sandwich bags containers is 8.7 x 7.3 in and 3 snack bags is 7.5 x 4.5 in, are perfect container for sandwiches, snacks, lunch, vegetables, fruit, babies food, cosmetics, jewelry make-up, stationery, travel and more.
- ♻【LEAK-PROOF & ESAY SEAL】 The storage silicone bags feature an upgraded double ziplock closures locks sealing technology are leak proof, easier to open and close, avoid spilling liquid objects and prevent the odor of different foods from mixing, you can store the soup or juice, sort and pack the lunch. So, reusable lunch bags is convenient to take food to work, school, travel, picnic. Transparent design allows for a quick glance at contents inside. Perfect for storing and preserving food.
- ♻【FREEZER ORGANIZATION & EASY TO CLEAN】The reusable freezer bags meal prep container can lock out freezer burn while keeping food fresh and full of taste, perfect for freezing meat, chicken, fish, fruits, and vegetables. Please do not use in the dishwasher. We recommend HAND WASH, for the dishwasher will damage the zipper of the food storage bags. Clean with the bottle brush and put the bags on the top of a mug or cup to air dry.
- ♻【REUSABLE & DURABLE】Silicone freezer bags are reusable and lightweight, they can be reused for hundreds of times, one extra thick reusable silicone storage bag can save more than 350+ disposable plastic baggies, which not only will change the way you store, cook and even eat but also can save your money and save the planet. At the same time, the reusable bag is also a more economical option for your househo
Prices pulled from the Amazon Product Advertising API on:
Product prices and availability are accurate as of the date/time indicated and are subject to change. Any price and availability information displayed on [relevant Amazon Site(s), as applicable] at the time of purchase will apply to the purchase of this product.
Refrigerating Sugar-Free Cookie Dough
Short-Term Refrigeration Strategies
If I’m not planning to store my sugar-free cookie dough for an extended period, I like to use the following short-term refrigeration strategies:
- Wrap dough in plastic wrap: This helps to seal in moisture and prevent the dough from drying out.
- Place dough in a resealable plastic bag: If I don’t have plastic wrap handy, I use a resealable plastic bag and press out as much air as possible before sealing it shut.
- Store dough on the lowest shelf: This is the coldest part of my refrigerator, helping to maintain the freshness of the dough.
Remember: It’s essential to label the dough with the date it was made, so I don’t forget how long it’s been stored.
Optimal Containers for Refrigeration
There are various options when it comes to containers for refrigerating my sugar-free cookie dough. Here are some of my recommendations:
| Container Type | Pros | Cons |
|---|---|---|
| Plastic Wrap | Seals in moisture | Can be difficult to unwrap |
| Resealable Bag | Easy to store, space-saving | May not seal completely |
| Airtight Container | Keeps dough fresh, easy to stack | Can take up more space |
When selecting a container, I prefer airtight containers because they offer the best protection against air, moisture, and odors. Glass containers with a silicone or rubber seal are my top choice since they’re easy to clean and don’t absorb any smells.
Remember, proper refrigeration can help extend the life of my sugar-free cookie dough and keep it tasting fresh and delicious.
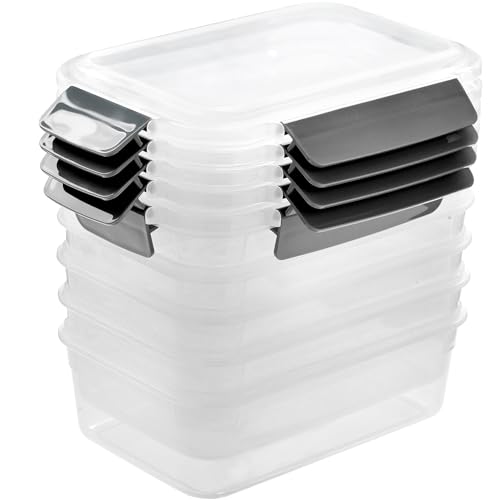
- Extra thick PP5 plastic ,BPA free, non toxic and odorless !
- Stackable and nestable design help to save space !
- Airtight and leak-proof snap lock lids!
- Dishwasher safe ,Freezer safe,Microwave safe ,Refrigerator safe !
- Perfect for meal prep ,leftover, lunch ,meat,fru
Prices pulled from the Amazon Product Advertising API on:
Product prices and availability are accurate as of the date/time indicated and are subject to change. Any price and availability information displayed on [relevant Amazon Site(s), as applicable] at the time of purchase will apply to the purchase of this product.
Freezing Sugar-Free Cookie Dough
Preparing Dough for Freezing
I love baking sugar-free cookies, and one of my favorite tricks is to prepare and freeze the dough in advance.
First, I like to portion my dough using a cookie scoop or spoon. This helps create uniform-sized cookies and makes it easy to bake just a few at a time.
- Scoop or spoon dough into uniform portions onto a lined baking sheet.
- Place the baking sheet in the freezer for 1-2 hours, or until dough balls are solid.
- Move frozen dough balls to an airtight container or freezer-safe bag.
- Clearly label and date the container to ensure freshness.
After portioning and freezing on a baking sheet, I transfer the frozen dough balls to an airtight container or a freezer-safe bag, making sure to squeeze out any excess air. It’s important to label and date the container so I can keep track of how long the dough has been stored.
Freezing tips:
- Make sure to leave space between the dough portions on the baking sheet so they don’t stick together.
- For added protection, I like to stack the dough balls between layers of wax or parchment paper in the container. This prevents them from sticking together while they’re in the freezer.
Thawing Frozen Dough
When I’m ready to bake my sugar-free cookies, thawing the frozen dough is simple.
- Remove the dough from the freezer and place it on a lined baking sheet, spacing the dough balls evenly.
- Let the dough thaw at room temperature for about 15 minutes.
- Bake as usual according to your recipe’s instructions. No need to adjust the baking time – it generally remains the same.
While thawing takes a little bit of patience, I find that it’s worth it to always have sugar-free cookie dough on hand for a guilt-free treat!
Shelf Life Considerations
When it comes to storing sugar-free cookie dough, there are a few factors that can affect its shelf life, and I want to help you understand those better. In this section, I’ll provide some handy tips on how you can determine the shelf life of your dough in both the refrigerator and the freezer.
Refrigerated Shelf Life
Properly storing sugar-free cookie dough in the refrigerator is crucial for ensuring its freshness and preserving its quality. I recommend considering the following factors:
- Temperature: It’s important to maintain a consistent temperature of 40°F (4°C) or below in your refrigerator to extend the dough’s shelf life.
- Type of container: Use an airtight container or tightly wrap the dough in plastic wrap to minimize air exposure.
- Expiration date: Always take note of the expiration date on the packaging or make a note of when the dough was made if it’s homemade.
With these factors in mind, here’s a handy table to help you understand the typical refrigerated shelf life of sugar-free cookie dough:
| Dough Type | Store-Bought | Homemade |
|---|---|---|
| Pre-packaged | 3-4 days | N/A |
| Homemade | N/A | 3-5 days |
Frozen Shelf Life
Freezing sugar-free cookie dough is an excellent option for longer-term storage. When freezing your dough, consider the following:
- Packaging: I suggest using airtight containers or freezer-safe plastic wrap or bags to minimize freezer burn and protect the dough’s flavor.
- Portioning: Divide the dough into smaller, individually wrapped portions for easy thawing and baking.
Below is a table that provides general guidelines for how long sugar-free cookie dough can last in the freezer:
| Dough Type | Store-Bought | Homemade |
|---|---|---|
| Pre-packaged | 3-4 months | N/A |
| Homemade | N/A | 3-6 months |
Remember, these guidelines are just a starting point. It’s best to always use your judgment to ensure your dough remains fresh and delicious before baking.

Handling Ingredients for Longer-Lasting Dough
When I’m preparing my sugar-free cookie dough, I find it essential to handle the ingredients correctly to ensure the dough stays fresh for as long as possible. Quality is key, so I want to share some of my tips to help you achieve the same success.
First, let me highlight the importance of choosing the highest-quality ingredients possible. Opting for fresh, unexpired ingredients not only guarantees a delicious taste, but also contributes to the dough’s longevity. Here’s the list of ingredients I use and some key points to consider:
- Flour: Unbleached and unexpired; store in a cool, dry place
- Butter: Use unsalted and choose high-quality brands; keep refrigerated
- Sugar substitute: Choose a sugar substitute that won’t spike blood sugar levels, such as erythritol, xylitol, or stevia
- Eggs: Choose organic and free-range; ensure they aren’t expired
- Flavorings: Opt for natural extracts like vanilla or almond; avoid artificial flavors
Once I have my ingredients ready, I pay close attention to the following steps to create a longer-lasting dough:
- Prepare a clean environment: I always make sure my working surface, utensils, and containers are clean and dry.
- Combine dry ingredients: I mix the flour, sugar substitute, and any other dry ingredients in a large bowl before moving to the wet ingredients.
- Combine wet ingredients: In a separate bowl, I blend the butter, eggs, and flavorings. Mixing wet and dry ingredients separately prevents the cookie dough from becoming overworked or too tough.
- No overmixing: When I combine the wet and dry ingredients, I mix them just until they’re combined, avoiding overmixing.
Proper storage is crucial for longer-lasting dough. Here are my recommendations:
- Divide the dough: If I don’t plan to use all the dough immediately, I divide it into smaller portions (enough for one batch of cookies).
- Wrap it well: I tightly wrap the dough portions using plastic wrap or aluminum foil, ensuring no air comes into contact with the dough.
- Label and date: I always tag the dough package with the date it was prepared to monitor its freshness.
- Storage: To keep the dough fresh, I either refrigerate it for up to a week or freeze it for up to three months.
Following these guidelines has helped me keep my sugar-free cookie dough fresh and delicious for extended periods, and I’m confident it can do the same for you.
Preventing Contamination and Odor Absorption
When I store sugar-free cookie dough, I always prioritize preventing contamination and odor absorption. The key is to use airtight containers that are both durable and easy to clean. Here are some quick tips for keeping your dough fresh, uncontaminated, and odor-free:
- Choose the right container: Opt for food-grade plastic, glass, or stainless steel containers. These materials are non-porous, meaning they won’t absorb odors or flavors from the dough or surrounding environment. Make sure the container has a tight-fitting lid as well!
- Wrap it up: I find it helpful to wrap the dough in plastic wrap or parchment paper before placing it in the container. This adds an extra layer of protection against potential contaminants and odors.
- Label and date: Don’t forget to label your container with the type of dough and the date it was made. I recommend using a permanent marker or easily removable label.
Here’s a quick breakdown of my go-to storage options for sugar-free cookie dough:
| Type of Container | Pros | Cons |
|---|---|---|
| Food-grade plastic | Lightweight, affordable | Can be prone to scratches |
| Glass | Odor and stain-resistant, Long-lasting | Breakable, Heavy |
| Stainless steel | Durable, Resistant to staining and odors | May be expensive, Can be heavy |
Another aspect to consider when storing your sugar-free cookie dough is the location. The best spot is away from any strong-smelling or high-moisture foods, such as onions or raw meat. The temperature should be consistently cool to maintain the dough’s quality.
One last tip is to store your dough in small, separate portions. This will not only minimize the risk of contamination but also make it easier to grab the exact amount you need for a recipe.
Labeling and Rotation Practices
I’ve found that labeling and rotation practices are essential. Not only do they help me keep track of the dough I’ve made, but they also ensure my cookies stay fresh and tasty.
Here’s what I’ve learned:
Firstly, it’s important to label each container with crucial information. I recommend putting this info in a table format for quick and easy reference.
Adding a short description of the dough, the date it was prepared, and the best by date can save me a lot of time and confusion when I’m searching for the right dough to use.
Next, I always make sure to rotate the dough in my refrigerator or freezer. This practice ensures that the older dough is used first, avoiding any chances of spoilage.
Here’s the rotation process I follow:
- Place the newly prepared dough containers at the back.
- Move the older dough containers to the front.
- Remember to use the front containers first, before diving into the newer ones.
By following this method, I ensure that my sugar-free cookie dough stays fresh and delicious, and I avoid wasting any dough.
These simple measures have greatly enhanced my sugar-free cookie dough storage experience. I hope they’ll help you too, and your cookies will always be fresh and ready to be enjoyed!
Troubleshooting Common Storage Issues
Sometimes, despite our best efforts, we can encounter problems when storing sugar-free cookie dough. Don’t worry, I’m here to help you troubleshoot some common issues.
Issue 1: Dough sticking to the container
If you find that your cookie dough is stuck to the container or cling wrap, try lightly greasing the container or wrap with a little cooking spray or oil first. This will prevent any sticking.
Issue 2: Dry or crumbly dough
If you let the dough sit for too long or store it improperly, it may dry out and become crumbly.
To prevent this, ensure your dough is wrapped tightly in cling wrap and stored in an airtight container. Should your dough become dry, you can try adding a few drops of water or milk to it and mix until it reaches the desired consistency.
Here’s a simple table to help you remember how long you can store sugar-free cookie dough, depending on the method of storage:
| Storage Method | Duration |
|---|---|
| Refrigerator | Up to 5 days |
| Freezer | Up to 3 months (optimal) |
Issue 3: Icy or freezer-burned dough
If you’re storing your cookie dough in the freezer, it can sometimes develop ice crystals or become freezer-burned.
To prevent this, ensure you’re using a freezer-safe, airtight container or a double layer of cling wrap to protect the dough from the harsh environment in the freezer.
Issue 4: Dough becoming too hard in the refrigerator
If you store your cookie dough in the fridge for an extended time, it may become too hard to work with once you take it out.
To avoid this, simply let the dough sit at room temperature for 15-30 minutes before working with it. This should soften it up nicely, allowing you to easily roll and cut the dough as needed.
More troubleshooting here:

Sugar Free Cookie Storage for Optimal Enjoyment!
Remember to focus on three key factors: temperature control, moisture management, and protection from cross-contamination. Store your dough in the refrigerator for short-term use or in the freezer for longer storage periods. Use airtight containers, plastic wrap, or resealable bags to keep your dough fresh and prevent it from drying out or absorbing unwanted odors.
Be mindful of proper labeling and rotation practices to avoid waste and ensure that you’re always using the freshest dough possible. By implementing these simple yet effective strategies, you’ll be able to enjoy delicious sugar-free cookies whenever you desire, without compromising on taste or quality.
FAQs
How do you store unused sugar cookie dough?
Wrap it tightly in plastic wrap or place it in an airtight container, and refrigerate for up to 3 days. For longer storage, freeze it for up to 3 months. When ready to use, thaw frozen dough in the refrigerator overnight before using.
How do you store unbaked sugar cookie dough?
Wrap the unbaked sugar cookie dough securely in plastic wrap or store it in an airtight container. Label the dough with the preparation date and refrigerate for a maximum of 5 days. Alternatively, you can freeze the dough for up to 3 months.


